


I taught an AI my photography style on a $250 GPU
By Bogdan Szabo
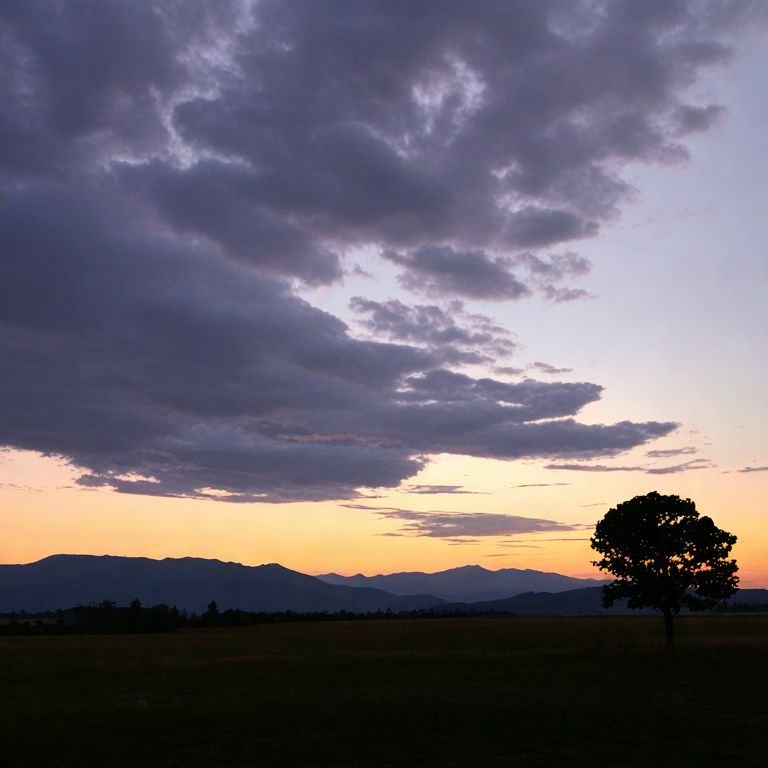
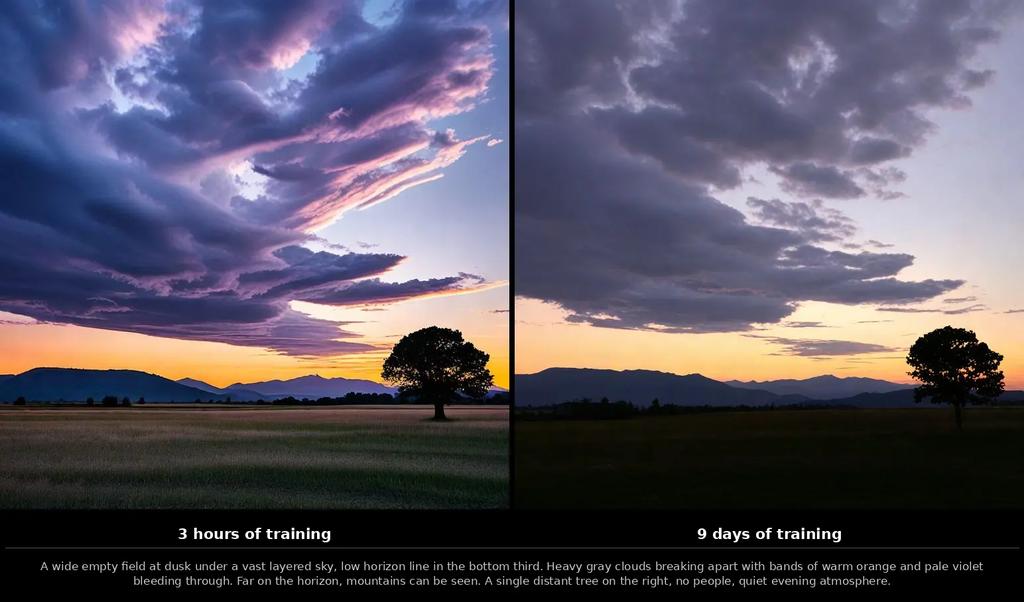
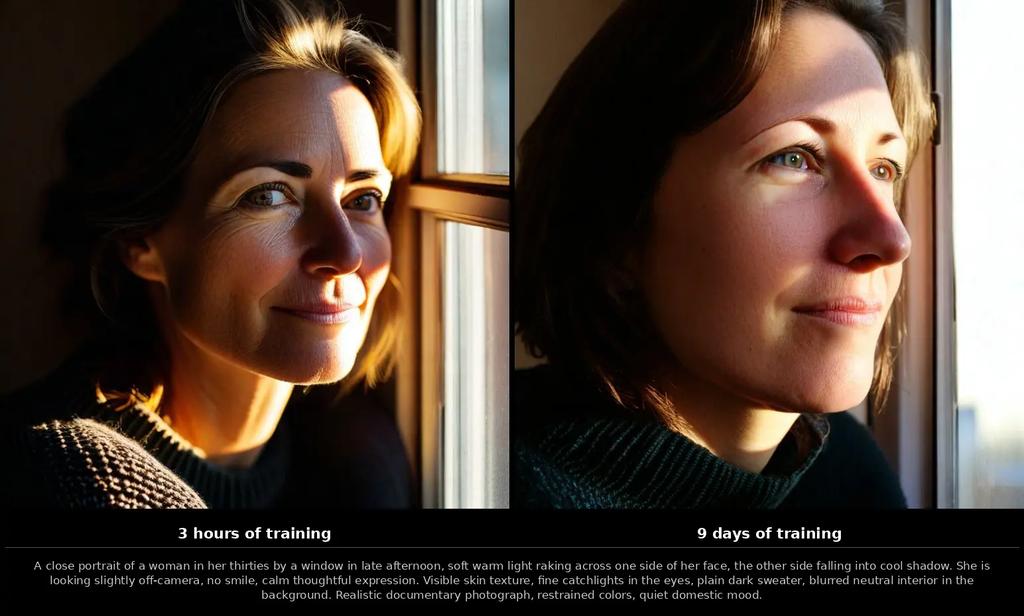
Same prompt, same random seed, two checkpoints. On the left, the model has been training for three hours. On the right, nine days. Look at the sky.
That's the whole article in two images. The rest is how I got there.
9 days of compute · ~€21 of German household electricity · 0.3 cents per generated image · 12 GB of VRAM · zero cloud GPUs
The goal: no more stock-photo AI
I am tired of AI images that look like perfect plastic stock photos. Too clean, too bright, that unmistakable "AI look." I wanted images that look like my photos.
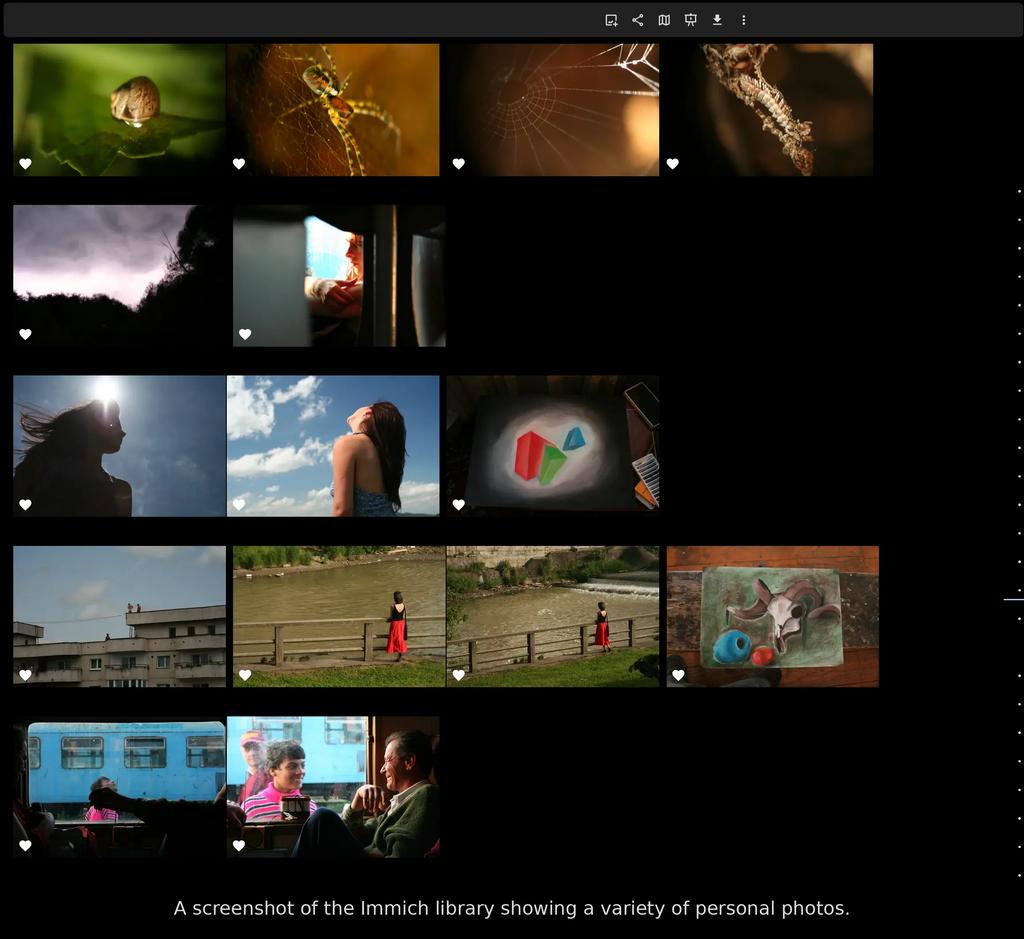
I have over 100,000 pictures in Immich. Years of work, alongside the family and travel shots. Photography has been my thing for a long time; some of those frames went through a lot of thinking before the shutter ever fired. The plan was simple: use them to teach a diffusion model my personal taste, on a single workstation, with nothing leaving the house. No cloud GPUs, no API keys, no uploaded photos.
Part 1: The robot critic
I gave a robot opinions about my photography and it was harsher than any critique I sat through in school.
Before you can train a model you have to tell it what it is looking at, and I was not going to caption 100,000 photos by hand. So I built a tool called describe-pics. It leans on a piece of AI called LLaVA, which is essentially a model that can look at any image and answer questions about it in plain English. To run LLaVA on my own computer rather than shipping photos off to somebody's cloud, I used a small program called Ollama, which makes it almost as easy to run a private AI as it is to start a desktop app. Together they gave me a free "describe this picture" tool sitting on my desk, and for every photo it did two things: it wrote an exhaustive description of the scene, and it scored the photo on nine factors: focus, exposure, composition, lighting, colors, creativity, depth, emotion, subject.
The trick that makes this actually work for training data is in the prompting. I make the model answer twice, once for the description and once for the score, and I reject any score that doesn't match a strict format. Up to three retries. A hallucinated rating never reaches the training set.
The same robot also voted on which way was up for 130,000 photos. It rotates each one through every orientation, asks LLaVA which version looks correct, and only writes back to Immich if the votes agree. The ones it can't decide on get logged for me to review.

Part 2: The training trick
The model I picked is called PixArt-Sigma. It belongs to the same family as Midjourney and Stable Diffusion, the so-called diffusion models, which learn to draw by starting from pure visual static and gradually removing the noise step by step until a picture appears. PixArt-Sigma is one of the better open-source members of that family, and the version I used has about 600 million internal "knobs," or parameters, that get tuned while the model trains.
There were faster shortcuts available. The most popular ones are called DreamBooth and LoRA: small add-ons that teach a base model one specific person or object using a handful of photos, leaving the rest of the model untouched. They're cheap, they're quick, and they're how most people personalize image AIs today. But they only really learn that one thing. I wanted something deeper, the model itself slowly rebuilt around my entire library, so I skipped the shortcuts and trained the whole thing.
The biggest problem with training a model like this is memory. My GPU, an Intel Arc B580, has only 12 GB of VRAM, the GPU's own private memory, which is fast but small and has to hold everything the model is currently working on. Image AIs don't actually understand sentences directly; they need a separate piece called a text encoder to translate a prompt like "a child laughing in a kitchen" into the long lists of numbers the image model can work with. The most popular text encoder for this kind of work is Google's T5, and T5 is enormous: 4.7 billion parameters, several times bigger than the image model itself. There is no universe where it fits on the GPU next to the transformer being trained.
The fix was to run T5 on the regular processor once, ahead of time, and save its output to disk. Each caption became a small file full of numbers, what the field calls an embedding, and the matching photo became another small file of numbers called a latent: a compact numerical version of the picture that the model can manipulate without dragging around millions of raw pixels. Working in this compressed numerical world is what makes modern image AI possible on consumer hardware at all. With every caption and every photo pre-translated, the GPU never had to load T5 itself, and it could spend all 12 GB on the actual training work. It was a "pay once, reuse forever" trade that turned an impossible workload into a feasible one. Almost every architectural decision in this project is downstream of that one number: 12 GB.
I also did not want to crop my photos into squares. Real photos come in all shapes, so I grouped them into nine aspect-ratio buckets (1024×1024, 1152×896, 1216×832, and so on) and trained on each ratio at its native shape. The model learned how to compose a wide landscape and a tall portrait without anything getting squashed.
Training crashed twice with out-of-memory errors mid-epoch. The habit of saving a checkpoint every 500 steps saved both runs.

Part 3: Watching the brain grow
Every 500 steps I saved a checkpoint, which is just a snapshot of the model written to disk, like a save file in a video game. Once training was done I had a long row of these snapshots, and I asked each one to generate the same image using the same prompt and the same random seed. The seed is the starting number that decides what the initial visual static looks like; if you pin it, along with the prompt, then any difference in the result has to come from the model itself, not from luck. So I pinned both, ran the same generation against every checkpoint, and lined the results up in order.
The result is a time-lapse of a brain growing. At step 4,000 the images look like wet paint. By step 72,000 they look like they came out of my camera.
The thing I did not expect: the model didn't learn to draw me or my friends. It learned my light. The way the sun sits in the generated images started to look exactly like the sunsets in my real library. The colors in the shadows shifted toward how my camera renders shadows. The framing relaxed into something closer to how I actually compose a frame. The model absorbed the vibe of my gear and my editing before it absorbed any specific subject. And, I think, a little of whatever it is that years behind a camera quietly drill into you.
Part 4: Looking inside the machine
This is the part I'm most proud of, and the part most articles don't have. Looking at a loss curve doesn't tell you why your sunset looks wrong. So I built a debugger for the model.
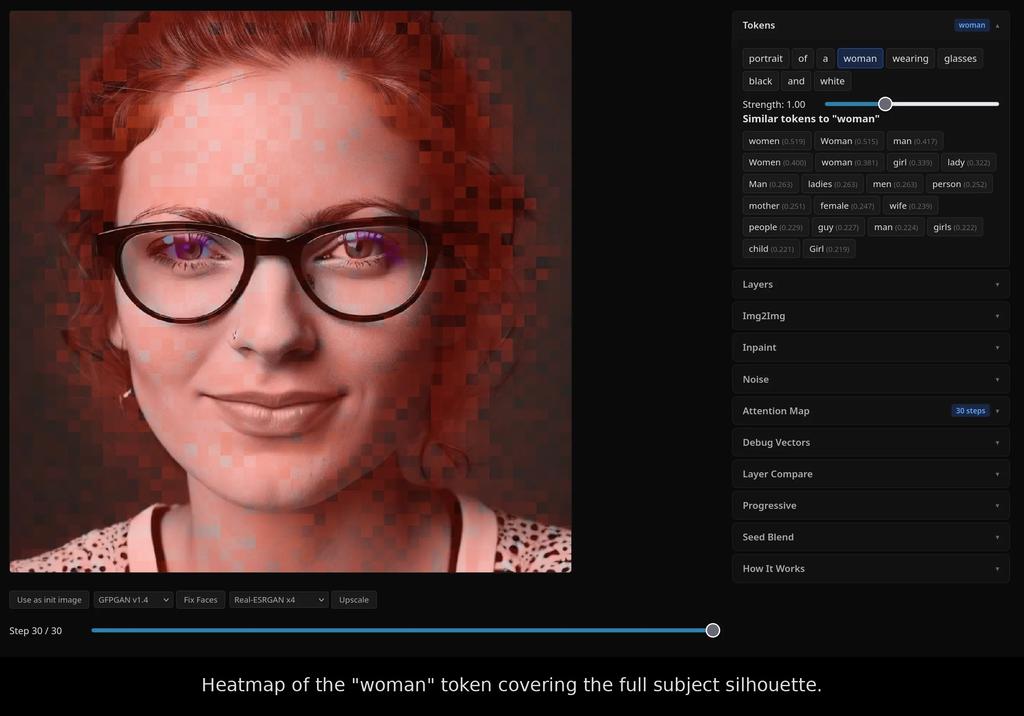
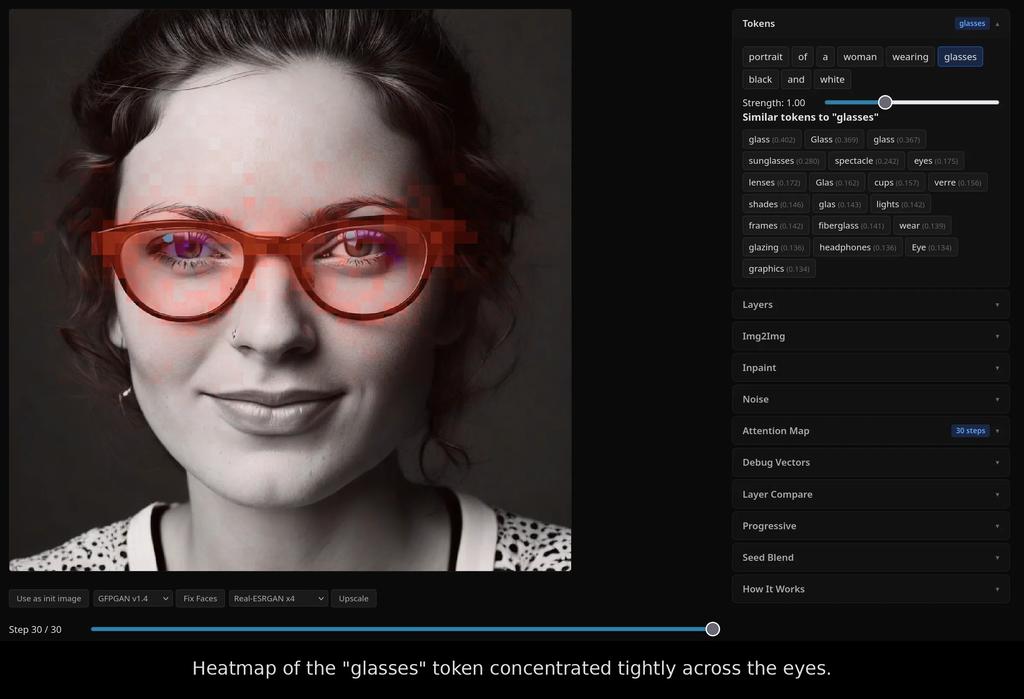
It is a small FastAPI + React app. You type a prompt, it generates an image, and then every word in the prompt becomes clickable. Click "sun" and the app overlays a heatmap showing exactly which pixels that one word influenced. Click "sky" and watch the attention shift to the top of the frame. The word "attention" here is the technical term the field actually uses: it's the mechanism the model relies on to decide which words in the prompt should affect which parts of the image. The same way your eyes don't paint the word "sun" across an entire page when you read it, the model focuses each word on the regions where it belongs. The heatmap is just a picture of where that focus landed.
Here is what that looks like in practice. I generated a portrait of a woman wearing glasses, then asked the app to highlight the pixels each token was responsible for. The "woman" token spreads across the face, hair, and shoulders, the silhouette of the subject. The "glasses" token collapses into a tight band over the eyes, exactly where you'd expect. The model isn't just memorizing words; it has learned where on the canvas each one belongs.
To make sense of what those heatmaps reveal, it helps to know one more thing about how the model is built. PixArt-Sigma is a transformer, which is the type of neural network behind almost everything called AI today, including ChatGPT. A transformer is a stack of layers, each one refining the work of the layer below it. PixArt-Sigma has 28 of them, and the introspection app lets me turn each one on and off independently. That alone is enough to start seeing what each layer is responsible for, which is exactly what the rest of the tool is built around.
A few of the things you can do with it:
- Scrub the denoising process. A diffusion model works by starting with pure visual static and removing a little of it at every step, gradually revealing the picture underneath; this gradual removal is called denoising. Dragging a slider through all 30 of those steps lets you watch the image come into focus.
Toggle individual transformer layers. PixArt-Sigma has 28 of them, and the app lets me render an image using only a chosen subset. The clearest way to see what each layer contributes is to widen the window from the bottom of the stack and watch what appears. Isolating just the first three layers (0–2) gives you almost pure abstract blur with a horizon-like band, no subject at all — those layers on their own aren't drawing the picture, they're feeding the ones that do. Open the window to layers 0–7 and the full portrait is already there: face, hair, glasses, sweater, soft and slightly painterly with the eyes a little dreamy. By 0–11 the irises and the knit pattern of the sweater lock in. By 0–15 the shirt picks up its print, the frames sharpen, freckles appear. From there the gains are subtle: 0–19 and 0–23 just push detail and skin tone closer to final, and at all 28 you get the catchlights and pore-level texture. The early layers do most of the heavy lifting on structure; the late ones polish detail.
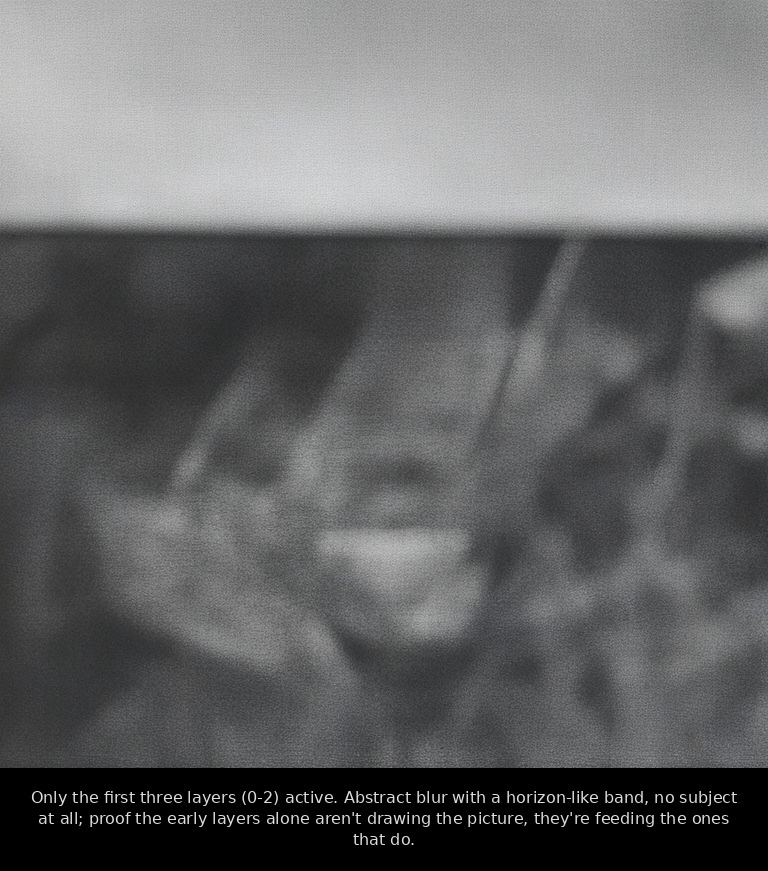
Only the first three layers (0-2) active 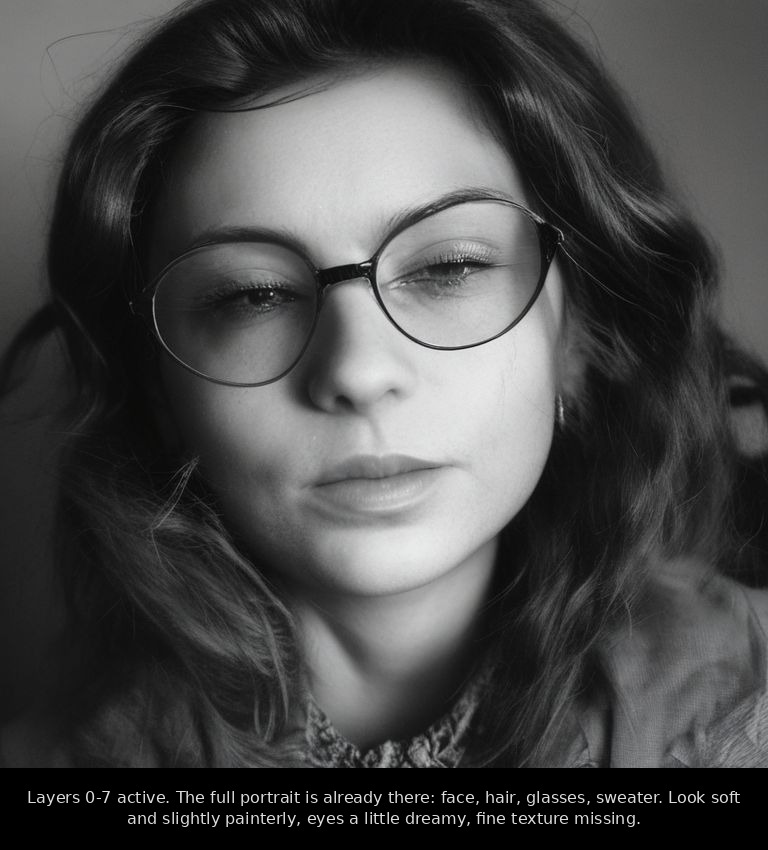
Layers 0-7 active 
Layers 0-11 active 
Layers 0-15 active 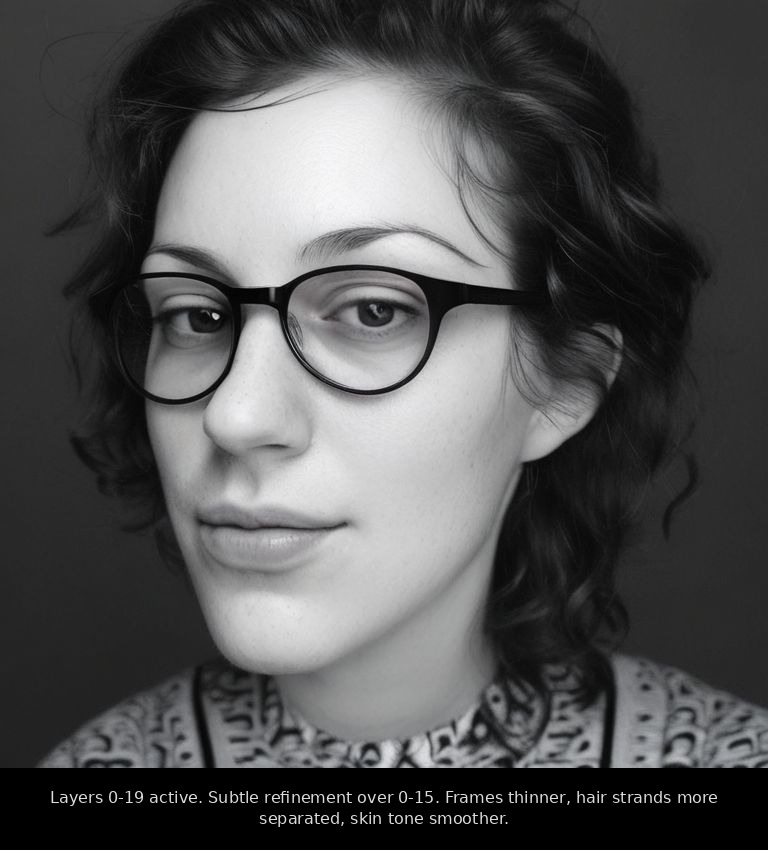
Layers 0-19 active 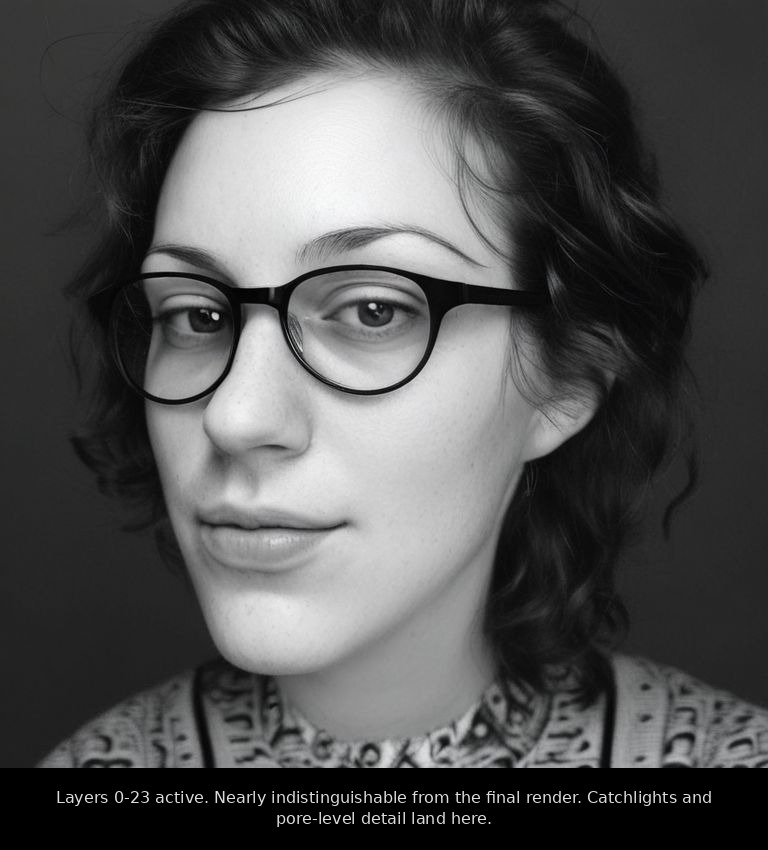
Layers 0-23 active 
All 28 layers active - The 28-layer × 30-step attention grid. A 2D heatmap showing which layers are doing the most work at which point in the denoising. You can click any cell and inspect that exact layer at that exact step.
- The token strength slider. Pick a single word, multiply its strength from 0× to 3×, regenerate. You can mute "sunset" out of a scene or amplify "fog" until the whole image is haze.
- Token suggestions via T5 embedding similarity. Click a word and the app surfaces the closest tokens in the encoder's vocabulary, often revealing alternate spellings or related words that hit the same regions harder than the original.
- Prompt blending. Switch the source of randomness halfway through the denoise to combine two prompts. My favorite output so far is the chimera you get from mid-denoise blending "a dog" and "a portrait of a person." Don't show it at dinner.
- Checkpoint switcher. Flip between training snapshots in the UI to compare what the model knew at step 10,000 vs step 70,000 on the same prompt.
I also tried hand-editing the random noise itself to nudge a generation in a specific direction. The image collapsed every time. The lesson: the noise isn't really random. It has to follow a bell curve, and the moment you break the distribution, the model gives up.
What I'd do differently
- Try a LoRA on top of the full fine-tune, to see if I can teach it specific people without losing the general "look I learned."
- Batch the T5 encoding more aggressively. The CPU pass was the slowest part of dataset prep.
- Rent an A100 for one weekend and run the full 100k × 5-epoch training I ran out of patience for at home.
Was it worth it?
People ask me if this is for "real work." It isn't. I did this because I was curious and I wanted to see if underdog hardware could carry a workload everyone says it can't.
The numbers earned a second look, and they're worth showing the math behind, because nothing is more annoying than a blog post that throws round numbers at you and hopes you don't ask.
The training log shows the GPU processing about 0.4 to 0.5 images per second, which works out to roughly ten seconds per training step. The model I'm calling "done" sits at 78,000 steps, so the pure compute time is 78,000 × 10 seconds, or about 217 hours: nine days if the machine had run uninterrupted, and closer to twelve in practice once you add the two crashes and a few restarts. The Intel Arc B580 has a rated power draw of 190 watts, and once you add the rest of the system idling around it (CPU, RAM, motherboard, fans), the wall socket sees about 280 watts under training load. Multiply that by 217 hours and you get roughly 61 kilowatt-hours of electricity, the same as running a typical fridge for a couple of months.
I live in Germany, where household electricity in 2026 still hovers around 35 euro cents per kilowatt-hour, so 61 kWh comes out to about 21 euros. If you live somewhere cheaper, divide accordingly: France would be closer to €15, Spain closer to €12, the United States more like $10. Generating a single image afterwards takes about a minute and a half on the same GPU, which works out to around 0.007 kWh, or roughly a third of a euro cent per image. At the prices people pay for cloud image generation, that's effectively free.
For comparison, renting an Nvidia A100 in the cloud costs about a dollar an hour and would have run this training maybe five times faster. So the cloud-equivalent cost would have been around fifty dollars, on top of the price of the rental account, the time spent setting up storage, and the trust required to upload 100,000 personal photos to someone else's machine. The B580 cost €250 once and now keeps producing images at a third of a cent each, forever.
You don't need a cloud subscription or a server rack. You need patience, a budget GPU, and a lot of your own photos.
The model didn't learn to draw me. It learned my light.
Built on PixArt-Sigma, Immich, Ollama, and a $250 Intel Arc B580. Code isn't public yet; if there's interest, I'll clean it up and push it.
Appendix: before and after
Same prompt, same seed, same number of steps. On the left, vanilla PixArt-Sigma straight off the shelf. On the right, the same model after nine days of training on my photo library. Each pair was generated with --steps 30 --guidance 4.5 --seed 42 on a 1024×1024 canvas, and the same negative prompt across the board: low quality, blurry, oversaturated, deformed hands, extra fingers, text, watermark, harsh flash, plastic skin, oversharpened.
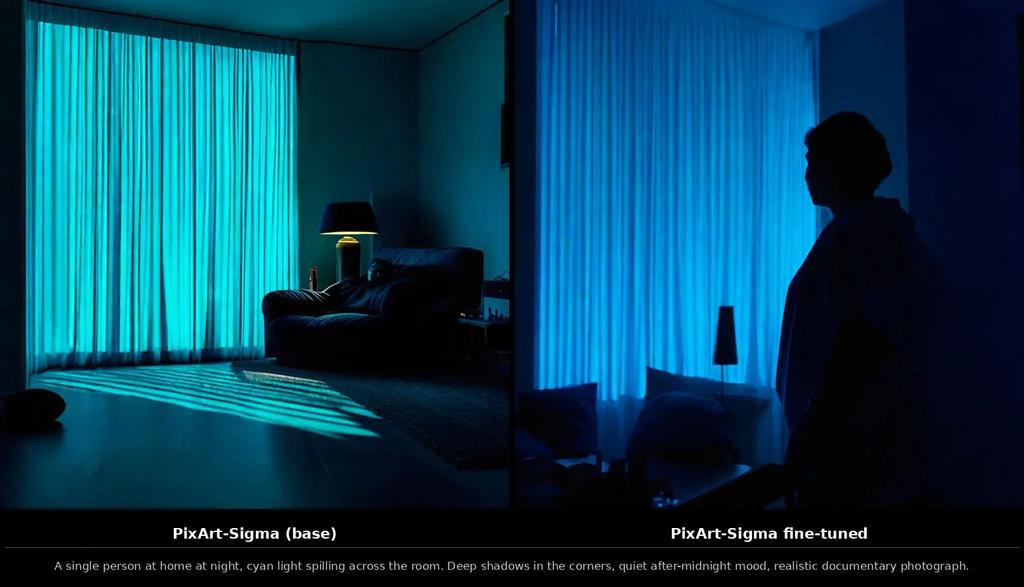
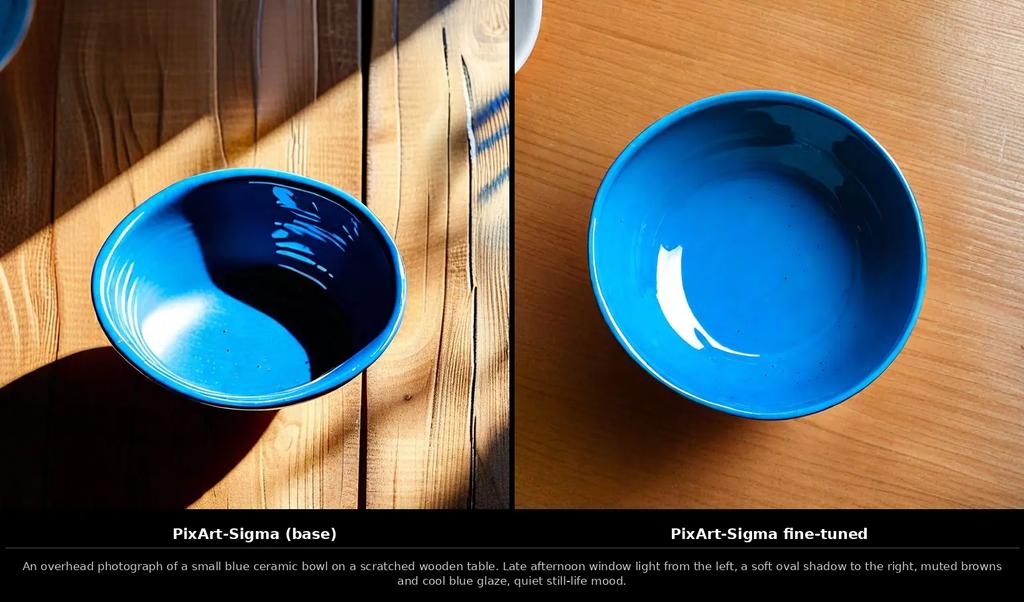
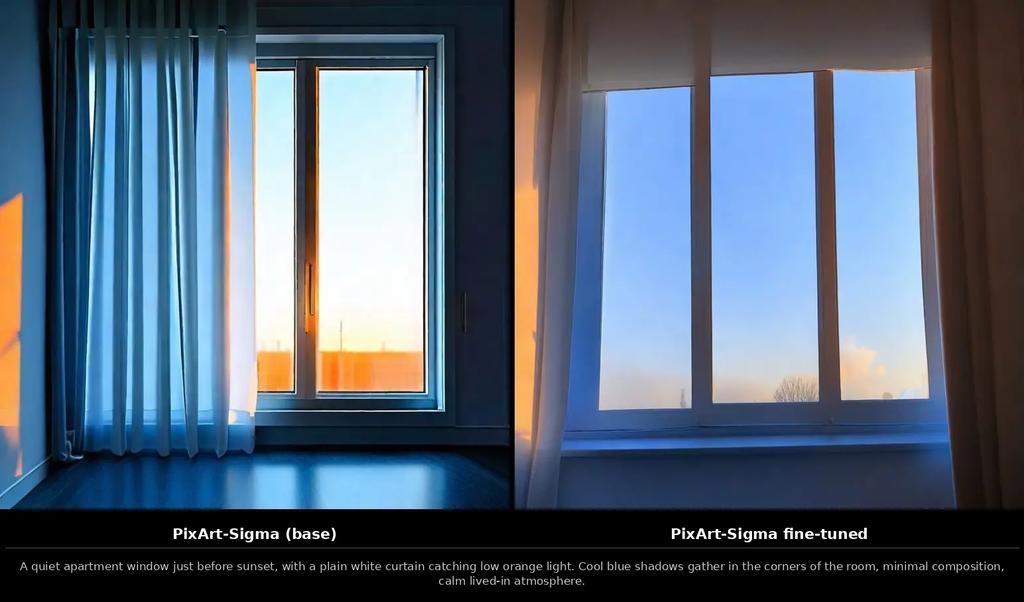
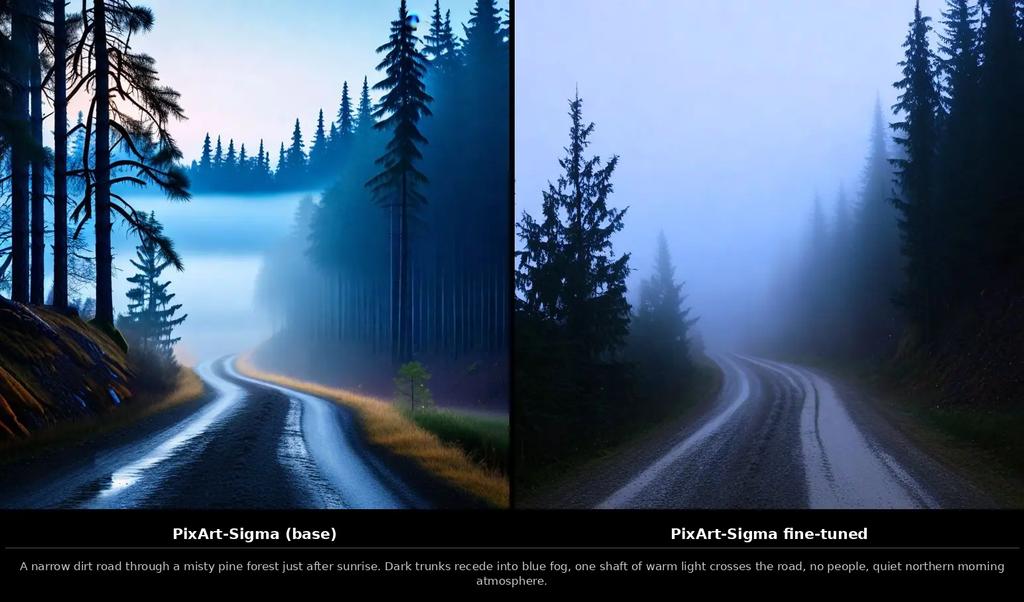
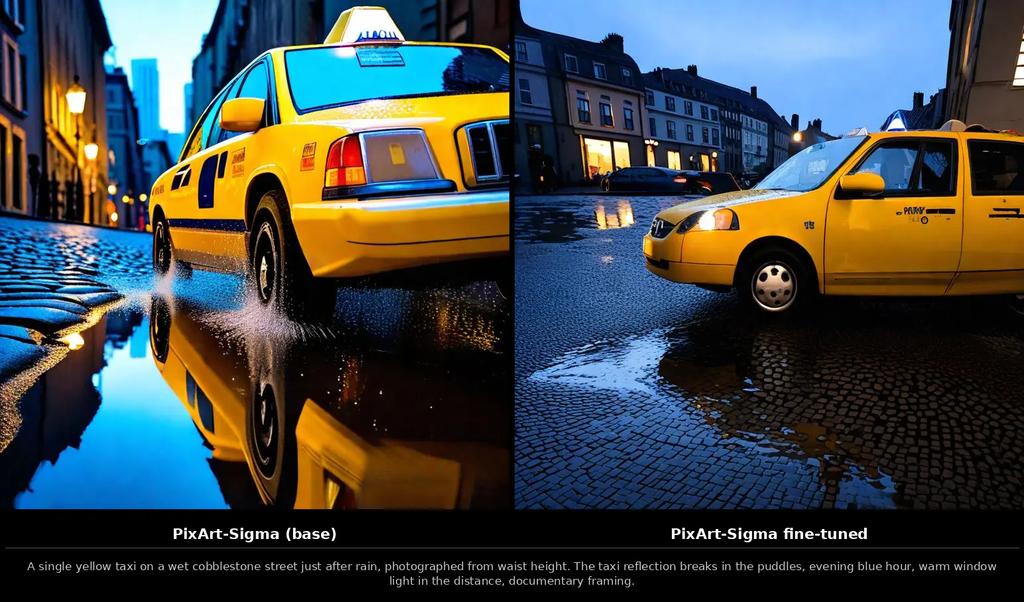
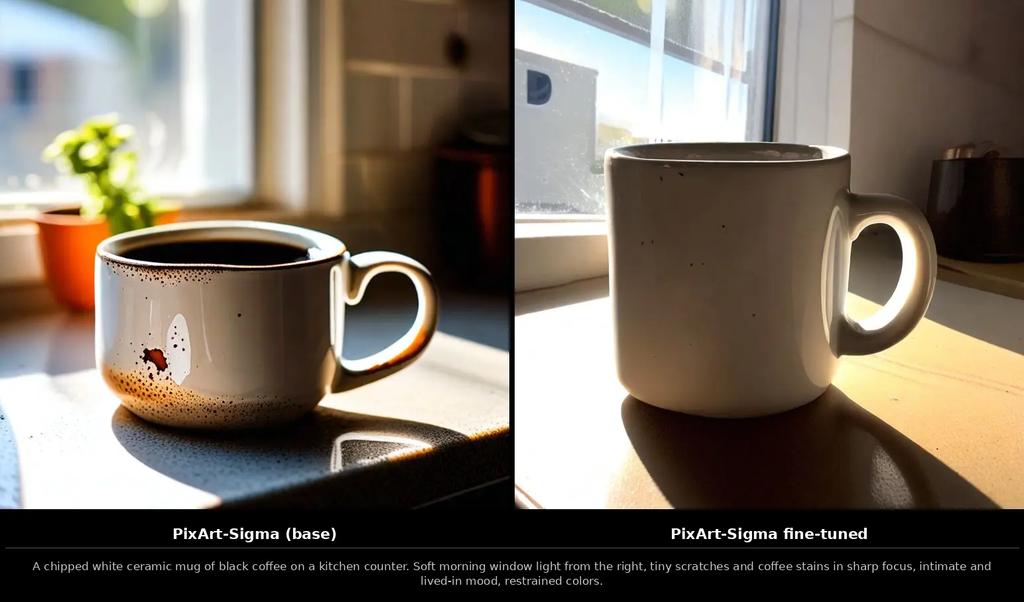
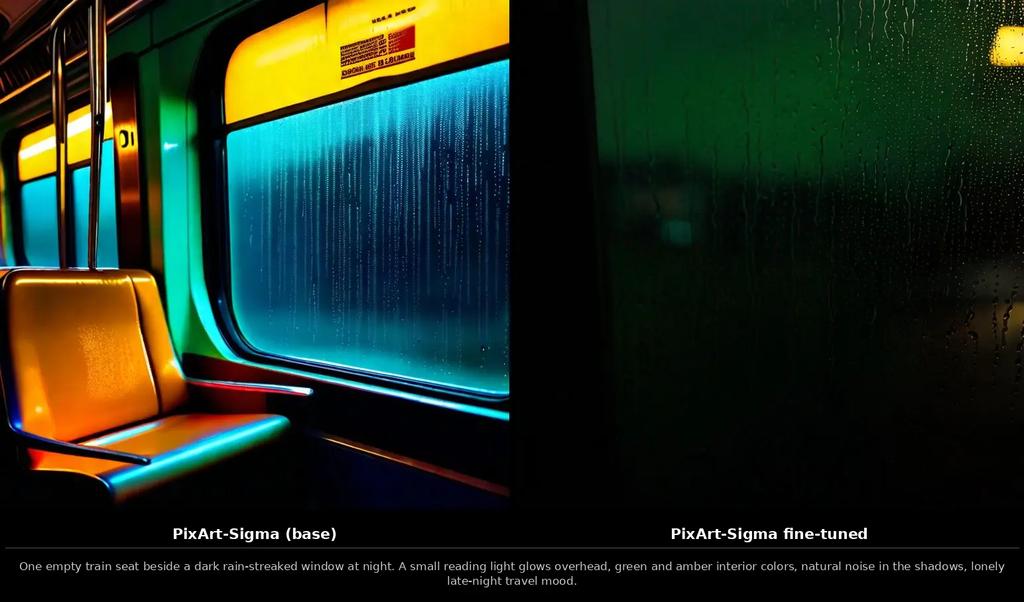
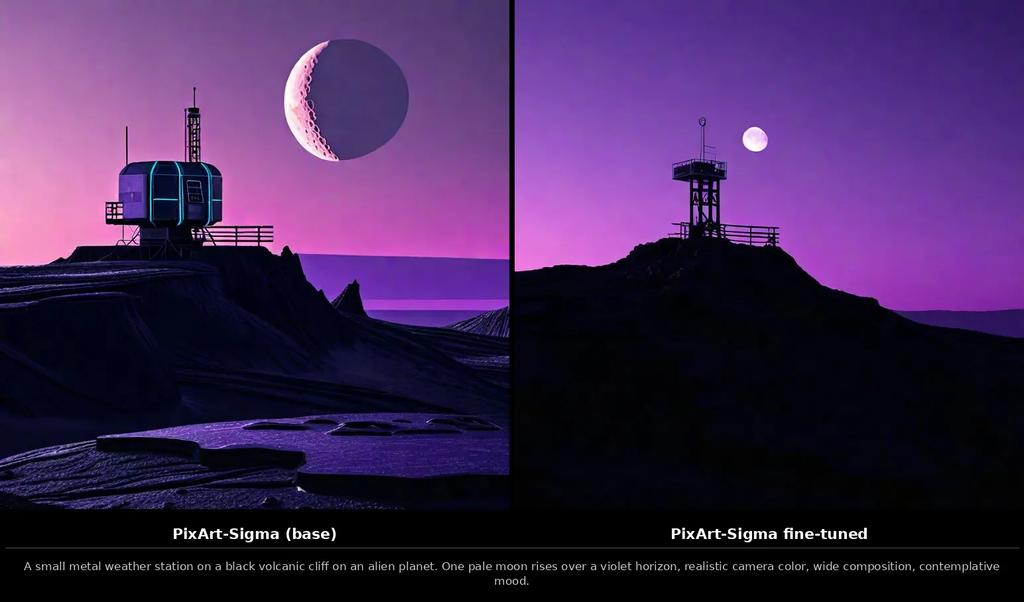
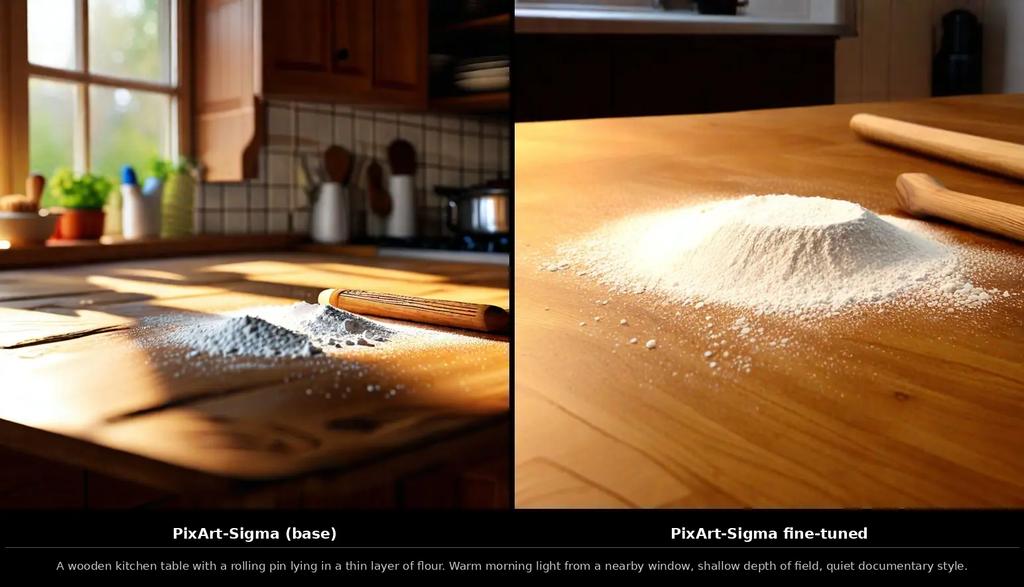
Table of Contents
The goal: no more stock-photo AI
Part 1: The robot critic
Part 2: The training trick
Part 3: Watching the brain grow
Part 4: Looking inside the machine
What I'd do differently
Was it worth it?
Appendix: before and after


Continue Exploring
You Might Also Like

A Pattern Language for Transformation
Browse our interactive library of 119 transformation patterns. Each one describes a specific architectural problem and a tested way to solve it, so your team can talk about real tradeoffs instead of abstract ideas.