


Slack-to-Atlassian AI Chatbot with n8n and MCP
By Michael Mueller
In this technical blog post, we're going to bridge the critical gap between team collaboration in Slack and the official record in Atlassian. We'll be using n8n as a developer-friendly automation engine, leveraging Model Context Protocol, and deploying everything on a production-grade Google Kubernetes Engine (GKE) cluster, managed with Terraform and Helm. This Infrastructure as Code approach ensures our system is not only powerful but also resilient, scalable, and reproducible.
Let's Talk About a Problem We All Know
In just about every company I've seen, the data lives in different places. This isn't a new insight, but it's one that always causes a special kind of pain when we look at how our teams actually work.
Think about it: all the "official" stuff - the project tasks, bug reports, the sacred technical docs, and knowledge base articles - is neatly tucked away in Atlassian's world, in Jira and Confluence. But where does the work happen? Where do we solve problems, debate solutions, and make decisions? Mostly in Slack.
This forces a constant, jarring context switch. It's a digital wall that we make our teams climb over, again and again. You're in the middle of a conversation, you need a piece of information, so you have to leave the flow, open a browser, log in, hunt for what you need, and then copy-paste it back into the chat. It feels like a small thing, but multiply that by dozens of times a day across an entire team, and the drag on productivity is massive. It's not just about wasted time; it's about breaking the momentum of collaboration. This is even more true if you happen to know about the search functionality within Atlassian tools.
Recently, Atlassian announced the availability of their MCP Server, which enables us to build a conversational interface right where the team lives, in Slack, that understands what you're asking for and fetches the information from Jira or Confluence for you. It is just like that colleague who knows all the right places to look for information. An assistant that can query the Atlassian suite, give you the gist of a long document, or even create a new ticket for you, all without ever leaving the Slack channel. This isn't just about data retrieval; it's about weaving data access directly into the fabric of our collaborative workflow.
We're going to walk you through the entire journey to a production-grade system. We've built this on a powerful, modern stack: the developer-first automation of n8n, using the Model Context Protocol (MCP) running on Google Kubernetes Engine (GKE).
Getting our Heads Around the Model Context Protocol (MCP)
At the very core of our solution is the Model Context Protocol, or MCP. You can read more about MCP in our previous blog post.
The Problem MCP Solves: Escaping the "N×M" Integration Mess
The world before MCP was a place Anthropic called the "N×M" data integration problem. In that world, every AI app or LLM (N) that needed to touch the real world required a custom-built connector for every single data source or tool (M) it wanted to use. The result was an unscalable 'spaghetti' of integrations. An LLM that could talk to Salesforce was mute when it came to Jira, unless you wrote a whole new chunk of code.
MCP fixes this by providing a universal protocol, built on solid, well-understood standards like JSON-RPC 2.0. This means a developer can build one MCP-compliant server for their data source, and any MCP-compliant AI client can use it, no matter what LLM is under the hood. It's a move from a tangled mess to a plug-and-play world for AI.
How it Works:
The protocol itself is a pretty straightforward client-server model, designed for secure and stateful conversations.
- MCP Clients: These are our AI apps or agents - the things that need data and tools. This could be Claude, Microsoft Copilot Studio, or in our case, a custom n8n workflow. The client is the orchestrator, managing the session with the server.
- MCP Servers: These are the applications that expose data and functionality. A server could be a wrapper around a database, an API, or even your local file system.
The server tells the client what it can do through three main concepts:
- Resources: These are things that provide information - files, database records, or Confluence pages. Resources are for reading data; they don't change anything.
- Tools: These are functions that do things. They can have side effects, like creating a Jira ticket, sending an email, or running a calculation.
- Prompts: These are reusable templates that can guide the LLM-server conversation for common tasks.
The Engine Room: n8n for Fast and Flexible Automation
To run the logic for our chatbot, we're using n8n, a flexible workflow automation platform. It gives you a visual, node-based way to build workflows, but it always lets you drop down into code when you need to handle complex logic.
n8n's Native AI Capabilities: Building the Brains
The choice of n8n allows us to use its native support for AI workflows. The platform isn't just a simple orchestrator; it's an environment for building and managing AI agents. n8n provides dedicated nodes for creating multi-step AI agents right on the canvas. We can define the agent's goals, pick our LLM, and give it a set of tools to work with.
The Bridge: A Flexible, Open-Source MCP Server for Atlassian
With our automation engine selected, we need to build the bridge to our Atlassian data. This means we need an MCP server that speaks both Jira and Confluence. While Atlassian has an official option, it is limited for use with Anthropic, at least for now. We found an open-source MCP server for Atlassian that we used instead.
The MCP server we used is this: https://github.com/sooperset/mcp-atlassian.
Core Features and Configuration
The sooperset/mcp-atlassian server provides the tools for talking to Atlassian, covering a wide range of read and write operations like jira_create_issue, jira_search, confluence_get_page, and confluence_create_page. It also supports multiple ways to authenticate - API Tokens for Cloud, Personal Access Tokens (PATs) for Server/Data Center, and OAuth 2.0 for more complex setups.
Configuration is all handled through environment variables, which makes it dead simple to deploy in a containerized environment like Kubernetes. Here are some of the key variables we'll need to set:
| Variable | Description | Example |
|---|---|---|
CONFLUENCE_URL | The base URL of the Confluence instance. | https://your-company.atlassian.net/wiki |
CONFLUENCE_USERNAME | The email address for the Atlassian account. | user@example.com |
CONFLUENCE_TOKEN | The Atlassian API token for authentication. | your_api_token |
JIRA_URL | The base URL of the Jira instance. | https://your-company.atlassian.net |
JIRA_USERNAME | The email address for the Atlassian account. | user@example.com |
JIRA_TOKEN | The Atlassian API token for authentication. | your_api_token |
READ_ONLY_MODE | Set this to "true" to disable all write operations for extra safety. | "true" |
ENABLED_TOOLS | A comma-separated list to explicitly enable only the tools you want. | "confluence_search,jira_get_issue" |
The Foundation: A Production-Ready n8n Deployment on Google Kubernetes Engine
With the architecture mapped out, it's time to get our hands dirty and build the thing. We're deploying our entire stack on Google Kubernetes Engine (GKE), which gives us a managed, scalable, and resilient home for our containerized n8n and MCP server apps. We're managing the whole deployment using Infrastructure as Code (IaC), which means our setup will be reproducible, version-controlled, and automated.
Architectural Overview: Building for Resilience and Scale
Our deployment isn't just a simple docker run command. We're building a setup that's ready for enterprise use, with automated SSL, DNS, persistent storage, and high availability baked in.
Here's a quick look at the cast of characters in our deployment and the role each one plays:
| Component | Role in the Architecture |
|---|---|
| Google Kubernetes Engine (GKE) | Our managed Kubernetes from Google. It's the core platform that will orchestrate and manage our applications. |
| Terraform | Our IaC tool of choice. We use it to define and provision all our GCP resources - the GKE cluster, VPC network, and our Cloud SQL database. |
| Helm | The package manager for Kubernetes. We use it to deploy and manage complex apps like n8n and its dependencies using reusable packages called "charts." |
| PostgreSQL | Our relational database running in Kubernetes. It provides persistent storage for n8n's workflows, credentials, and execution history, so we don't lose data when pods restart. |
| ingress-nginx | A Kubernetes Ingress controller that acts as the front door to our cluster. It manages all external HTTP/S traffic and routes it to the right internal services (like the n8n UI). |
| cert-manager | A native Kubernetes certificate management tool that automates getting and renewing SSL/TLS certificates from issuers like Let's Encrypt. All our traffic will be encrypted. |
| external-dns | A Kubernetes service that automatically syncs our exposed services with our DNS provider. It will create the DNS records in Google Cloud DNS to point our domain to our n8n instance. |
The benefits of this approach is that it's declarative and GitOps-friendly. We define our infrastructure in Terraform files and our applications in Helm. The complete state of our system is captured in code. This code lives in a Git repository, which gives us version control, peer reviews for changes, and a full audit trail of our infrastructure. While we'll walk through the manual commands here, this foundation is exactly what you need for a fully automated GitOps workflow with tools like Argo CD or Flux.
Part I: Infrastructure as Code with Terraform
First, we'll stand up the cloud infrastructure with Terraform. This ensures our environment is consistent and repeatable every time.
Prep the GCP Project: Before we run Terraform, we need to create a project in Google Cloud and enable the right APIs. We have a simple shell script,
setup-gcp.sh, that handles this for us. It will also generate a.tf.envfile that will be used in the next step.Define and Deploy Infrastructure: Our Terraform files define all the GCP resources. The
variables.tffile holds customizable parameters like our project ID, region, and zone. The main config files (gke.tf, providers.tf and outputs.tf) define the GKE cluster.To deploy it all, we run the standard Terraform commands:
Shell
# Load environment variables from our config file
source .tf.env

# Initialize the Terraform workspace
terraform init

# See what Terraform plans to do
terraform plan

# Apply the plan and build the resources
terraform apply
- This will take a few minutes while GCP provisions everything.
Part II: Kubernetes and DNS Configuration
Once the GKE cluster is up and running, we need to configure kubectl, the Kubernetes command-line tool, to talk to it.
- Configure kubectl Access: This
gcloudcommand will fetch the cluster's credentials and configurekubectlfor us automatically:
gcloud container clusters get-credentials n8n-cluster \
    --region $REGION \
    --project $PROJECT_ID
- Set up Cross-Project DNS: Our
external-dnscomponent needs permission to create DNS records in Google Cloud DNS. For our setup, we have a DNS zone delegated to another Google Cloud project, and we will use this with the external-dns in our project. You can also set this up differently to make it work for your setup. For our case, we have created a shell script,setup-dns.sh, that handles the cross-project access by creating a GCP service account with thedns.adminrole and binding it to a Kubernetes service account. This will allow external-dns to securely manage DNS records, even if our DNS zone is in a different GCP project.
Part III: Deploying Core Services with Helm
With the infrastructure ready, we use Helm to deploy the essential in-cluster services that will support our main applications.
- Install cert-manager: This component is critical for automating HTTPS. It will watch for Ingress resources and automatically provision TLS certificates for them.
helm install cert-manager jetstack/cert-manager \
  --namespace cert-manager \
  --create-namespace \
  --version v1.18.0 \
  --set crds.enabled=true
- Install ingress-nginx: This Ingress controller will manage all external access. On GKE, it automatically provisions a Google Cloud Load Balancer to get traffic from the internet into our cluster.
helm install ingress-nginx ingress-nginx/ingress-nginx \
  --namespace ingress-nginx \
  --create-namespace \
  --version 4.12.3 \
  --set controller.service.type=LoadBalancer
Part IV: Deploying n8n and the MCP Server
Now for the main event: deploying our core applications.
- Deploy the n8n Stack: We have a Helm chart for
n8n-stackthat deploys n8n with all the necessary configs. We'll first edit thevalues-production.yamlfile to customize our deployment, setting our domain name, deploying our PostgreSQL database, and providing an email for Let's Encrypt.
helm install n8n ./n8n-stack \
  --namespace n8n \
  --create-namespace \
  --values ./n8n-stack/values-production.yaml \
  --wait \
  --timeout 10m
Deploy the mcp-atlassian Server: We'll deploy the https://github.com/sooperset/mcp-atlassian MCP server with all the things required:
mcp-atlassian.yaml.- First, we define a
Secretto securely hold our Atlassian API key, which you'll need to create here: https://id.atlassian.com/manage-profile/security/api-tokens. - Next, we define in the
Deploymentthe Docker image versionghcr.io/sooperset/mcp-atlassian:{VERSION}. We'll populate the environment variables in the container from ourSecret. - Finally, we define a
Serviceof typeClusterIP. This will expose the Deployment inside the cluster at a stable DNS name, likemcp-atlassian.n8n.svc.cluster.local, so our n8n pods can find it.
- First, we define a
We then apply this manifest to our cluster:
kubectl apply -f mcp-atlassian-deployment.yaml
Verification, Management, and Troubleshooting
After deploying, we need to make sure everything is running as expected.
- Check Pod Status: See the status of all our apps in the
n8nnamespace:
kubectl get pods -n n8n
We want to see all pods in the
Runningstate.Inspect the Ingress: Find the public URL of our n8n instance:
kubectl get ingress -n n8n
This will show us the domain name and the external IP of the load balancer.
View Logs: If things aren't working, logs are our best friend:
# View n8n logs
kubectl logs -n n8n -l app.kubernetes.io/name=n8n-stack -f

# View MCP server logs
kubectl logs -n n8n -l app=mcp-atlassian -f
Troubleshooting Common Issues:
- Pods Stuck in
Pending: Runkubectl describe pod <pod-name> -n n8n. This usually points to resource shortages or problems with storage. - SSL Certificate Failures: Run
kubectl describe certificate -n n8n. This will show you events from cert-manager, which can tell you about DNS propagation issues or rate limits from Let's Encrypt. - DNS Not Resolving: Check the logs of the
external-dnspods to make sure they've seen the Ingress and created the DNS record.
- Pods Stuck in
Crafting the Conversational AI Workflow in n8n
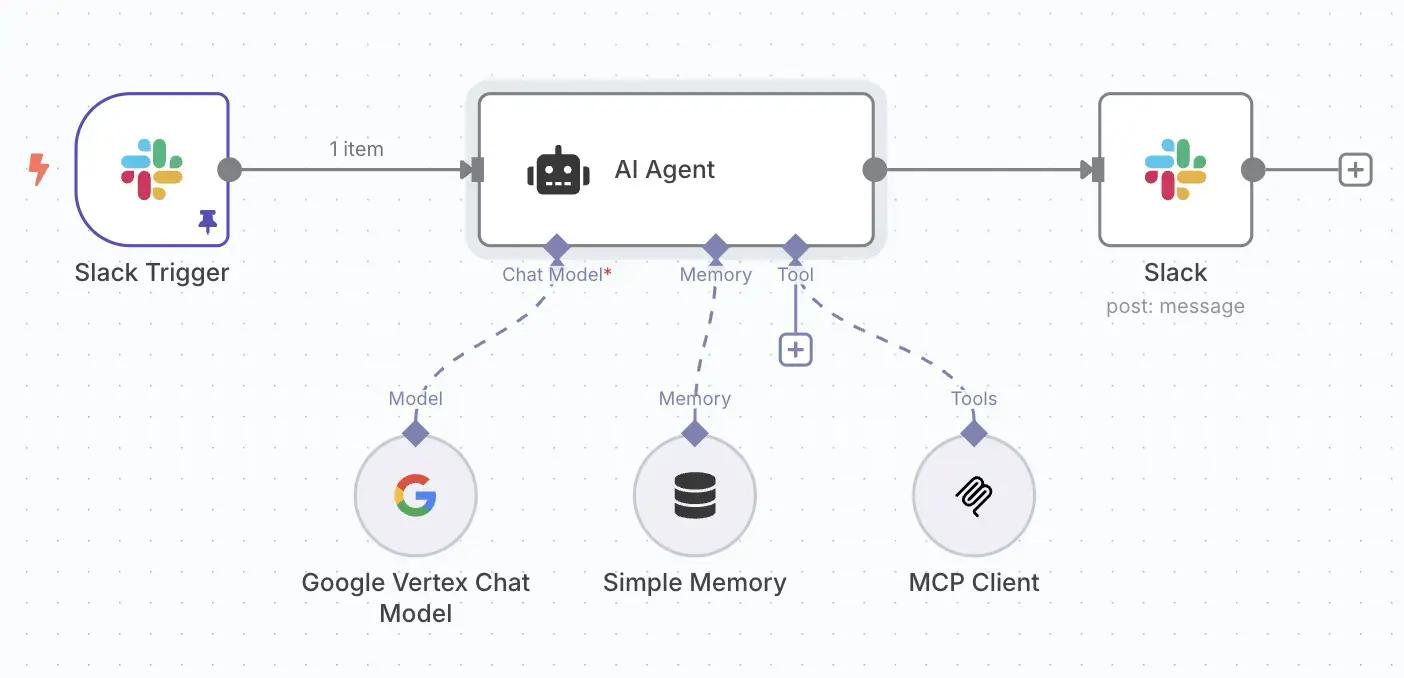
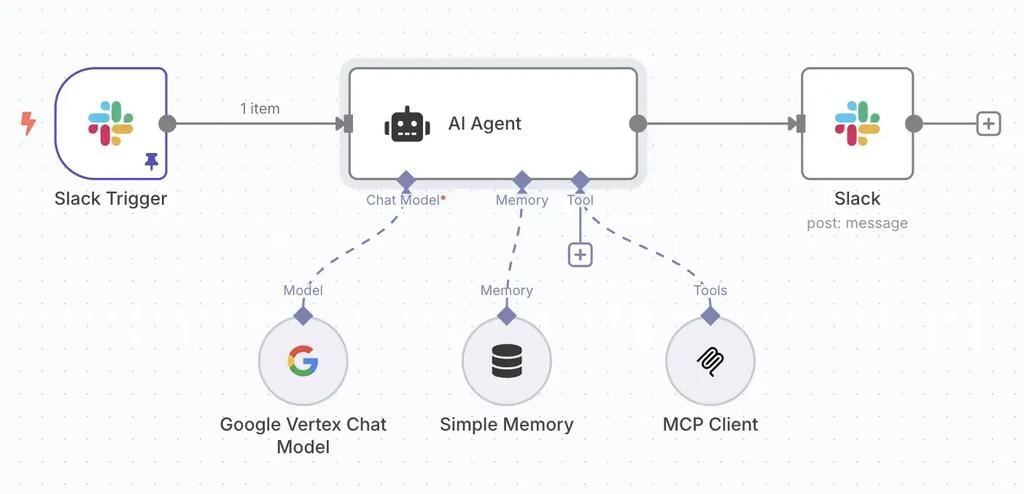
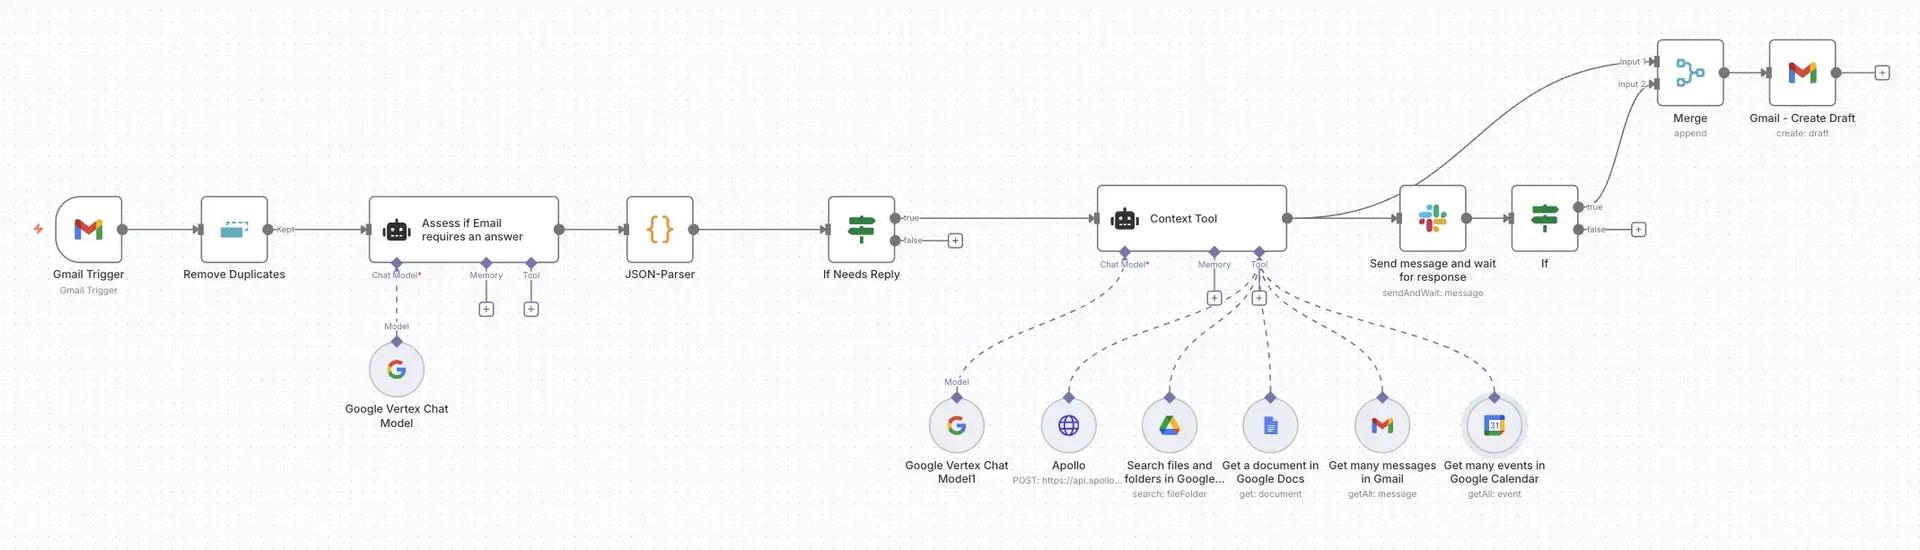
With our entire infrastructure stood up and all our services running, we're ready to build the n8n workflow that brings our AI chatbot to life. This is where we wire everything together on the n8n canvas: the Slack interface, our AI brain, and the Atlassian toolset.
Configuring the Core Components: Slack and Vertex AI
Before we build the workflow itself, we need to configure n8n to connect to Slack and Google's Vertex AI. This involves setting up credentials, a one-time task that securely stores the keys n8n needs to access these services.
1. Setting up Slack Credentials
First, we'll give n8n permission to act on our behalf in Slack.
- Create a Slack App: Navigate to api.slack.com/apps and click "Create New App." Choose to build "From scratch," name it something like "AtlassianBot," and select the workspace you want it to live in.
- Configure Permissions: In your new app's settings, go to the "OAuth & Permissions" page. Scroll down to the "Scopes" section. Under "Bot Token Scopes," you'll need to add permissions for the bot to function. A good starting set is:
app_mentions:read: To see when it's mentioned.chat:write: To post messages back in the channel.channels:history: To read messages in public channels it's a part of.groups:history: To read messages in private channels it's invited to.channels:join: To join public channels in a workspace.channels:read: To view basic information about a channel.
- Install the App: Scroll back to the top of the "OAuth & Permissions" page and click "Install to Workspace." This will generate a "Bot User OAuth Token" (it will start with
xoxb-). Copy this token. - Add Credentials to n8n: In your n8n instance, go to the "Credentials" section in the left-hand menu. Click "Add credential," search for "Slack," and select it. Give it a name, paste your
xoxb-token into the "Access Token" field, and save. - Add Webhook to Slack: In your n8n instance, go to the top of your Slack trigger node. Click on “Webhook URL” and copy the “Production” URL. Then go back to Slack, navigate to “Event Subscriptions,” and enable them. Paste the URL into the request URL field, and it should show as verified. Then go down to “Subscribe to bot events” and select
app_mention. “Save” and you're done.
2. Setting up Vertex AI (Gemini) Credentials
Next, we'll connect n8n to Google's Vertex AI to access the Gemini models.
- Enable the Vertex AI API: In your Google Cloud Project, make sure the "Vertex AI API" is enabled. You can do this from the APIs & Services dashboard.
- Create a Service Account: Navigate to "IAM & Admin" > "Service Accounts" in your GCP console. Click "Create Service Account." Give it a name (e.g.,
n8n-vertex-ai-user) and a description. - Grant Permissions: In the "Grant this service account access to project" step, assign it the role of "Vertex AI User." This gives it the necessary permissions to call the models.
- Generate a JSON Key: Once the service account is created, click on it, go to the "Keys" tab, and select "Add Key" > "Create new key." Choose JSON as the key type and click "Create." A JSON file will be downloaded to your computer. This file contains the private key - keep it secure.
- Add Credentials to n8n: Back in n8n's "Credentials" section, click "Add credential" and search for "Vertex AI." Paste the entire content of the downloaded JSON file into the "Service Account JSON" field. Save the credential.
With these credentials in place, n8n now has secure access to both Slack and Vertex AI, and we can start building the workflow logic.
The n8n Workflow Canvas
The final workflow is a flow of nodes. You can visually trace the data from the initial Slack message, through the AI processing steps, all the way to the final response posted back to the channel.
Anatomy of the AI-Powered Workflow
Here are the key nodes that make up our workflow:
- The Trigger (Slack Node): It all starts with a Slack trigger. We configure this node to listen for events in a specific Slack channel. For a chatbot, we'll set it to fire whenever our bot gets an @-mention. This ensures the workflow only runs when someone is talking to it directly.
- The Brain (AI Agent Node): This is the heart of our operation. We use n8n's powerful AI Agent node and configure a few key things:
- LLM Selection: We choose which Large Language Model we want to use; in this case, we chose
gemini-1.5-flash-latest. - System Prompt: We write a detailed system prompt to give our AI its personality and purpose. For example:
"You are AtlassianBot, a helpful assistant. Your job is to answer questions about Jira projects and Confluence docs. Be concise and accurate. Generic questions should first be answered using confluence_search. For status updates or things that might be in a ticket, use jira_search. To get the URLs of the pages or tickets use confluence_get_page or jira_get_page." - Tool Definition: This is the magic link. We define a custom tool inside the agent's configuration. This tool represents our connection to the
mcp-atlassianserver. We configure it to make an HTTP POST request to the internal Kubernetes service address of our MCP server (e.g.,http://mcp-atlassian-service.mcp-atlassian.svc.cluster.local:9000/sse). The body of this request will be a JSON-RPC payload that the AI agent will construct itself to call a specific Atlassian function, likeconfluence_search.
- LLM Selection: We choose which Large Language Model we want to use; in this case, we chose
- The Hands (MCP Tool Execution): When our AI agent decides it needs to use its Atlassian tool, the n8n workflow executes the HTTP request we just defined. The request goes from the n8n pod directly to the MCP server pod. The MCP server receives the request, talks to the Jira or Confluence API using the credentials we gave it, and sends the result back to the n8n workflow.
- The Response (Slack Node): The final output from the AI Agent node - the human-readable answer formulated by the LLM after it gets the data from its tool - is passed to one last Slack node. This node posts the message back to the original Slack channel, usually as a reply in a thread to keep the conversation organized.
A Sample Conversation
Let's make this real. Imagine this conversation happening in your Slack:
User in the #customer-support Slack channel:
@AtlassianBot Can you find the Confluence page for our Q3 OKRs and give me a summary of the key results for the engineering team?
The Bot's Internal Process (orchestrated by n8n):
- The Slack trigger fires with the user's message.
- The message goes to the AI Agent node. The LLM understands it needs to do two things: find a Confluence page and then summarize a part of it.
- The agent decides to use its custom Atlassian tool. It builds a JSON-RPC call for the
confluence_searchtool with the query "Q3 OKRs". - n8n sends the HTTP request to the
mcp-atlassianserver. - The MCP server gets the request, calls the Confluence API, finds the page, and returns the full page content to the n8n workflow.
- This content is fed back into the AI Agent node as the result of the tool call. The agent now has the context it needs.
- The LLM reads the full page, finds the key results for the engineering team, and writes a concise, natural-language summary.
- This final summary is passed to the last Slack node.
The Bot's response posted in the Slack thread:
Of course! I found the "Q3 2025 OKRs" page. For the Engineering team, the key results are:
- Reduce CI/CD pipeline duration by 15%.
- Achieve 99.95% uptime for the main API.
- Resolve 90% of P1/P2 bugs within 48 hours.
This whole exchange happens in just a few seconds, right in the flow of conversation. That's the power and efficiency of the system we've just built. As a final thought, you can decide if you want to use a single, combined MCP client or dedicated clients for Jira and Confluence. A dedicated client may allow for more precise prompts, which might lead to slightly better results.
Summary
In this deep dive, we've bridged the critical gap between team collaboration in Slack and the official record in Atlassian. By leveraging a modern, scalable tech stack, we've transformed a common productivity bottleneck into a seamless, conversational workflow.
We started creating a standardized, reusable bridge to our Atlassian data. We chose n8n as our developer-friendly automation engine, using its native AI capabilities to orchestrate the entire process.
The entire solution was deployed on a production-grade Google Kubernetes Engine (GKE) cluster, managed with Terraform and Helm. This Infrastructure as Code approach ensures our system is not only powerful but also resilient, scalable, and reproducible.
The result is more than just a chatbot; it's a powerful AI assistant that brings vital information directly to your team's conversations. By eliminating context switching and making data access instantaneous, we empower our teams to stay in the flow, make faster decisions, and ultimately, be more productive. This architecture serves as a robust blueprint for building your own intelligent, integrated solutions.
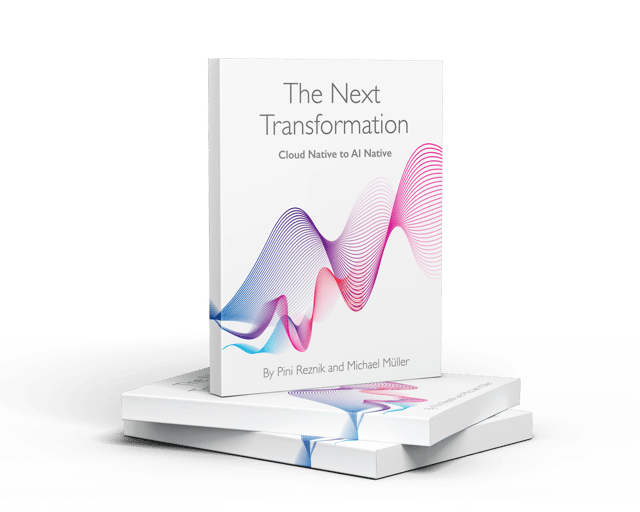
MCP is one piece of a larger shift in how engineering organisations build and operate with AI. Our book, From Cloud Native to AI Native, covers the full picture — from architecture through to operating model — and what we've learned in practice. Download it for free!.
Table of Contents
Let's Talk About a Problem We All Know
Getting our Heads Around the Model Context Protocol (MCP)
The Engine Room: n8n for Fast and Flexible Automation
The Bridge: A Flexible, Open-Source MCP Server for Atlassian
The Foundation: A Production-Ready n8n Deployment on Google Kubernetes Engine
Crafting the Conversational AI Workflow in n8n
Summary
Continue Exploring
You Might Also Like

A Pattern Language for Transformation
Browse our interactive library of 119 transformation patterns. Each one describes a specific architectural problem and a tested way to solve it, so your team can talk about real tradeoffs instead of abstract ideas.